어플/Graphics2012. 2. 13. 13:16

The final canvas:

Here is a video showing the steps required:

Here are the steps in more detail:

Create a new document 500×500

Create a new layer

Select the circular marque tool, draw a circle, fill it with black

Create a new layer, fill it with this pattern: Dimple.pat (Download it, open it, select the Paint Bucket tool, select Pattern in the Tool Options menu and choose the new pattern)

Resize the pattern so it is just big enough to cover the circle, rotate it so the gradients point diagonally.

Command+Click the circle layer thumbnail

Select the pattern layer.

Choose Filter>Liquify from the top menu

In the Liquify dialog box choose the Bloat tool, make your brush very large, larger than your circle, make brush pressure 100, brush density 50. Click Show Backdrop (bottom right). Click in the centre of the canvas and hold for a moment, long enough to bloat the pattern. Click OK

Option click on the line between your pattern layer and your circle layer so that the circle clips the pattern

Add a gradient overlay to your circle layer, select Radial, click reverse, scale 150%

With your circle layer selected choose Layer>Layer Style>Create Layer

Move your newly created Gradient Fill layer up and to the left so that the highlight is on the top left of your golf ball

Merge all layers (except the Background)

Duplicate your layer.

Filter>Render>Lighting Effects and add some light from the top left with these settings:

Next add a slight inner glow (white), and an inner shadow coming from the bottom right.

Create a new layer, draw a smaller circle with the marquee, feather it by 8 pixels and fill it with white. Position it top left of your golf ball and clip it with the circle beneath

Choose your lower circle layer, fill it with white, choose your higher circle layer turn the Fill down so the ball looks whiter

Choose two grassy type greens, one each for your foreground and background. Fill the bg with one of the greens, create a new layer above it and fill it with the other, then choose Filter>Noise>Add Noise, settings 160%, Gaussian, Monochromatic. Make the layer opacity 50% and the layer type Opacity.

Select the bottom circle layer and add a drop shadow, angle top left, long distance:

Choose Layer>Layer Style>Create Layers, make the newly created Drop Shadow layer 70% opacity, duplicate this layer and stretch it out to the right, turn its opacity down to 20

Create a new layer above your two background layers and fill it with green, add a gradient to it, make the layer 50%, Darker Color

Merge all your background layers into one layer and duplicate the newly merged layer

Choose Filter>Blur>Gaussian Blur: Radius 1.1

Choose Filter>Sharpen>Unsharp Mask: Amount 43, Radius 1.0, Threshold 0

Merge any ball layers into one layer, duplicate this layer and choose Filter>Artistic>Plastic Wrap: highlight strength 5, detail 6, strength 7. Turn the opacity of your plastic layer down to 70% and mask the top left corner.

Done!

Click to download PSD templates, web templates 

[Source] templatis

'어플 > Graphics' 카테고리의 다른 글

Create Golf ball or Sports Logo photoshop tutorial  (1) 2012.02.13
[Photoshop] Golf ball 만들기  (0) 2012.02.13
[Photoshop] 잔디효과 만들기  (0) 2012.02.13
Posted by 프로처럼
어플/Graphics2012. 2. 13. 13:14

1

1. Make a new canvas. Here, I used 800 x 800 pixels, 72 dpi, RGB, background white
2. Invert your background to make it black
2. Make a new layer
3. Use your circular marquee to draw a circle and fill it with white


2

4. Make a new document, 20 pixels x 20 pixels, RGB, background transparent
5. Use your circular marquee to draw a circle and fill it with black

3

6. Edit: Define pattern (call it Dimples)
7. Go back to your original document (Ctrl-Tab) and make a new layer
8. Ctrl-click Layer 1 (the white circle you created) and press Shift-Delete to bring up your Fill options dialogue
9. Select Pattern, and fill with your Dimples pattern


4

10. Press Ctrl-T to bring up Free Tansform and rotate this layer 45 degrees. Press Enter.
11. Filter:Blur:Gassian Blur 2.0 pixels
12. Now Ctrl-click Layer 1, and hit Ctrl-F to repeat the blur


5

13. Filter>Distort>Spherize 100%


6

14. Now we'll finish the map by creating the contour of the ball itself. Press D to reset your palette, press X to invert the colours, and select your gradient tool (G).
15. Select radial gradient, foreground to background and change the opacity to 50%. Make sure your original circle is still selected, and draw a gradient from the center of the circle to the outer edge


7

Now we have a successful map to apply lighting effects.
16. Create a new layer, hold down alt, and merge visible. This will be our rendering channel. Select all, copy, create a new channel, and paste.
17. Hit RGB composite, and go back to the merged layer
18. Press Shift-Delete and fill with 50% Grey
19. Now go into Filter:Render:Lighting effects
Now here's where the fun begins. you can create whatever lighting you like. For this one in particular, I used a spotlight and an omni light. Change your texture channel to Alpha 1 (the one we created) and set white is high and height 50.


8

20. Hit okay.


9

21. Now we'll delete the extra material. Ctrl-click the original circle layer, invert the selection, and hit Backspace. Good. It's just a little harsh. No sweat, we'll lighten it up a bit with levels.


10

22. Press Ctrl-L to go into levels, and drag the Black triangle on the gradient at the bottom of the dialogue up to 125. I also brought the grey point down to 1.30


11

22. Now we'll just finish it up with some layer effects. Hide the two source layers, and double click the final render to get into layer effects.
Here I used the following...
Inner Shadow
Hard Light with Black
Angle -159
Distance 49 px
Choke 0%
Size 62 px
Colour Overlay
Blending mode Color
Colour #929AA0
Opacity 100%
Gradient Overlay
Blending Mode Overlay
Style: Linear
Angle 24 degrees
Scale 70%
I also made the background white again.
Here is the final before touhups...


12


Thanks for visiting PhotoshopCAFE come back for more great tutorials

'어플 > Graphics' 카테고리의 다른 글

Create Golf ball or Sports Logo photoshop tutorial  (1) 2012.02.13
Create a golf ball using Photoshop  (4) 2012.02.13
[Photoshop] 잔디효과 만들기  (0) 2012.02.13
Posted by 프로처럼
어플/Graphics2012. 2. 13. 13:05

'어플 > Graphics' 카테고리의 다른 글

Create Golf ball or Sports Logo photoshop tutorial  (1) 2012.02.13
Create a golf ball using Photoshop  (4) 2012.02.13
[Photoshop] Golf ball 만들기  (0) 2012.02.13
Posted by 프로처럼
어플/Programming2012. 2. 3. 12:40
1. 프레임워크 등록
무엇보다도 먼저, 자신의 App에 프레임워크를 등록해주어야 한다.
왼쪽 'Group & Files'에서 'Frameworks'에서 오른쪽 버튼을 누르고, 'Add...'-'Existing Frameworks'를 선택한다.
그리고, 'StoreKit.framework'를 선택하여, 해당 프레임워크를 추가한다.

2. 헤더 등록
In App Purchase를 이용하기 위해서는 기본적으로 다음과 같은 헤더파일들을 추가해주어야 한다.

#import <StoreKit/SKProductsRequest.h>

#import <StoreKit/SKProduct.h>

#import <StoreKit/SKPaymentQueue.h>

#import <StoreKit/SKPaymentTransaction.h>


3. 스토어 설정 및 Observer 등록
먼저, 스토어를 사용할 수 있는지 확인해야 하고, 사용 가능하다면 Observer를 등록해야 한다.

if ([SKPaymentQueue canMakePayments]) { // 스토어가 사용 가능하다면

NSLog(@"Start Shop!");

[[SKPaymentQueue defaultQueue] addTransactionObserver:self]; // Observer 등록한다.

}

else

NSLog(@"Failed Shop!");


옵져버를 등록할때, 해당 인스턴스는 SKPaymentTransactionObserver Protocol을 구현해야 한다. 그중 update만을 구현해도 사용하는데 문제 없다.

3. 옵져버 update만들기
옵져버로 등록된 클래스에 update를 등록해 준다.

- (void)paymentQueue:(SKPaymentQueue *)queue updatedTransactions:(NSArray *)transactions

{

    for (SKPaymentTransaction *transaction in transactions)

    {

        switch (transaction.transactionState)

        {

            case SKPaymentTransactionStatePurchased:

                [self completeTransaction:transaction];

                break;

            case SKPaymentTransactionStateFailed:

[self failedTransaction:transaction];

                break;

            case SKPaymentTransactionStateRestored:

[self restoreTransaction:transaction];

            default:

                break;

        }

    }

}


해당 트랜젝션의 결과에 따라서 각각 구분하도록 프로그래밍이 되어 있는데, 각 함수들은 다음과 같이 만들면 된다.


- (void) restoreTransaction: (SKPaymentTransaction *)transaction

{

NSLog(@"SKPaymentTransactionStateRestored");

[[SKPaymentQueue defaultQueue] finishTransaction: transaction];

}

- (void) failedTransaction: (SKPaymentTransaction *)transaction

{

NSLog(@"SKPaymentTransactionStateFailed");

[[SKPaymentQueue defaultQueue] finishTransaction: transaction];

}

- (void) completeTransaction: (SKPaymentTransaction *)transaction

{

NSLog(@"SKPaymentTransactionStatePurchased");


NSLog(@"Trasaction Identifier : %@", transaction.transactionIdentifier);

NSLog(@"Trasaction Date : %@", transaction.transactionDate);


[[SKPaymentQueue defaultQueue] finishTransaction: transaction];

}


이런식으로 구성하면 된다.

4. 아이템정보 가져오기
특정 아이템 정보를 가져오기 위해서는 SKProductRequest를 사용한다.

SKProductsRequest *productRequest = [[SKProductsRequest alloc] initWithProductIdentifiers:[NSSet setWithObject:@"testitem_01"]];

productRequest.delegate = self;

[productRequest start];

여기서 initWithProductIdentifiers 에는 아이템 등록할때 넣었던 'Product ID'를 넣을 수 있으며, 배열로 여러개 동시에 넣을수도 있다.

델리게이트는 SKProductRequestDelegate Protocol을 구현해야 한다.

위의 요청이 성공하게 되면, responseRequest를 호출하게 되는데, 다음과 같이 받을 수 있다.

- (void)productsRequest:(SKProductsRequest *)request didReceiveResponse:(SKProductsResponse *)response {

NSLog(@"SKProductRequest got response");

if( [response.products count] > 0 ) {

SKProduct *product = [response.products objectAtIndex:0];

NSLog(@"Title : %@", product.localizedTitle);

NSLog(@"Description : %@", product.localizedDescription);

NSLog(@"Price : %@", product.price);

}

if( [response.invalidProductIdentifiers count] > 0 ) {

NSString *invalidString = [response.invalidProductIdentifiers objectAtIndex:0];

NSLog(@"Invalid Identifiers : %@", invalidString);

}

}


5. Item 결제 요청 하기
원하는 아이템을 결제요청은 SKPayment를 이용한다.

SKPayment *payment = [SKPayment paymentWithProduct:product];

[[SKPaymentQueue defaultQueue] addPayment:payment];


이렇게 해주면, 그 뒤는 애플에서 알아서 처리하도록 되어 있다.

결제가 끝나면, 지정해준 Observer의 update함수가 호출된다.

#import <StoreKit/SKPayment.h> 추가 필요

[출처] creative-xenos
 
Posted by 프로처럼
어플/Sensor2012. 1. 30. 15:40

개요

모션프로세싱은 콘솔 및 휴대용 게임기 분야에 새로운 차원의 양방향 지원을 가져왔다. 그러나 진정한 1:1 게임을 위해선 여러 센서와 멀티축 자이로가 결합된 모션프로세싱이 필요하다. 게임 컨트롤러 응용기기에 주로 사용되는 MEMS 자이로센서는 자계나 직선가속도의 방해 없이 중요한 회전정보를 제공해준다. 더욱 향상된 모션프로세싱 기능은 닌텐도 Wii Motion Plus™에서 볼 수 있는데, 더욱 민감하고 정확한 3D 게임 제스처를 위해 닌텐도는 인벤센스의 멀티축 자이로센서를 사용했다.

Wii Motion Plus™와 같은 게임기에 사용되는 자이로의 필수 조건은 넓은 감지범위, 명확한 교차축 분리, 우수한 진동 보완능력, 높은 충격 내성 및 작은 사이즈이다. 인벤센스의 IDG-650™은 바로 이러한 조건을 만족시키는데, 그 사양은 ±2,000°/sec (dps)의 감지범위, <±1%의 교차축 감도, 10,000g의 충격 저항성, 4x5x1.2mm의 작은 패키지 사이즈가 바로 그것이다. ISZ-650™ 1축(Z) 자이로는 모든 센서들이 다른 시스템 기기와 평면 탑재된 솔루션에 대해 IDG-650 2축(X/Y) 자이로를 보완하여 준다.

Selection and Integration of MEMS-based Motion Processing in Consumer Apps (452K PDF)

게임 컨트롤러 시스템 도표

Game Controller system block diagram

인벤센스 MEMS Gyro의 장점

  • ±2,000°/sec의 빠른 동적 모션 감지
  • 높은 민감성을 위하여 각 축마다 2개의 분리된 출력이 낮은 해상도의 아날로그-디지털 변환기(ADC)를 사용하여 시스템 비용을 감소시킴
  • IDG-650은 평면으로 디자인된 통합 싱글칩으로 우수한 X/Y 교차축 교정을 이룬다. ISZ-650 1축(Z) 자이로는 모든 센서들이 다른 시스템 기기와 평면 탑재된 3축 자이로 솔루션에 대해 IDG-650 2축(X/Y) 자이로를 보완하여 준다.
  • 우수한 진동 보완 디자인
  • 10,000g의 높은 충격 저항성
  • 바이어스 드리프트를 최소화하는 오토제로 기능
  • 4x5x1.2mm의 세계 최소사이즈의 2축 자이로
  • 경쟁사에서 따라올 수 없는 사이즈, 성능 및 비용을 가능케 하는 인벤센스 고유의 Nasiri-Fabrication 제작플랫폼

인벤센스 제품 추천

IDG-650 2축 자이로와 ISZ-650 Z-축 자이로센서는 업계 최소 사이즈와 강력한 시그널 조절기능이 통합된 2축 자이로를 제공하여 게임 컨트롤러 응용기기에 사용하기에 최상의 제품이다.

관련 문서

새로운 Wii MotionPlus™ 속으로

잃어버린 퍼즐 조각!


Wii MotionPlus
에 사용된 인벤센스의 dual-axis
MEMS Gyroscope

인벤센스에서 개발한 모션프로세싱의 대발전이라 할 수 있는 IDG-600 2축 MEMS 자이로의 추가로, 이제 Wii에서 게이머 컨트롤러의 더욱 정밀한 움직임을 위한 진정한 1:1 모션프로세싱이 가능해졌다.

MEMS Rate Gyroscope란?

Wii MotionPlus에는 매우 다양한 형태의 자이로가 내장되어있지만, 모든 3축 즉, X(pitch), Y (roll), Z (yaw)축에 따른 회전율을 측정하는 칩이 있다. 칩 패키지 내부에는 Wii MotionPlus 에 탑재된 리모컨으로 사용자의 회전 움직임을 감지하는 Micro-Electromechanical systems (MEMS)가 있다.

Wii에서 이것이 어떻게 작용하는가?

현재 Wii리모컨에서 사용된 Wii 센서바와 3축 가속도계를 조합하면서, 이제 닌텐도는 Wii Motion Plus의 추가로 MEMS rate gyroscope의 성능을 소개해주고 있다. 과거에는 단순히 컨트롤러를 튕기면서 위/아래, 왼쪽/오른쪽, 앞/뒤 등의 움직임만이 감지되었었고, 크고 작은 모션의 차이를 구별해내지 못했었다. 그러나 새로운 Wii리모컨 아래에 부착된 MotionPlus는 매우 작은 움직임도 게임에 정확하게 반영된다.

더 많은 정보는 최근 발행된 EE Times를 통해서 MEMS기반 모션 프로세싱 어플리케이션에 대한 내용을 볼 수 있다.

미래형 게임이 도달했다!


Wii Remote Plus, with built-in
in 3-Axis gyroscope

Wii가 게임 업계에 처음 소개됐을 때, 새로운 모션프로세싱 기술로 업계 대변혁을 가져왔으나 리모컨 내부의 모션 기술은 단순한 3축 가속도계에 의존하였다. 그 결과, 게임의 모션 제어 요소는 단순한 액션 이상일 수 없었다. 기본 움직임으로 여겨졌던 탑스핀, 슬라이스 또는 앞으로 찌르기 등의 모션은 불가능한 것이었다. 문제는 가속도계가 단일 면 상의 막연한 움직임에 반응하는 최소의 게임에만 가능했다는 점이었다. 가속도계는 크고 작은 제스처의 차이를 구별하는데 어려움이 있었고, 리모컨은 3D공간에서 정확하게 작동되지 못했었다. 이제는, 진정한 1:1 모션프로세싱 성능을 지닌 3축 자이로센서로 Wii 시스템에서 사용자에 민감하게 반응하는 게임 플레이가 가능해졌다. 당신이 게임 트레일러를 확인할 때, 소프트웨어 개발자들이 Wii의 새로운 모션프로세싱 능력을 완벽히 활용한다는 것을 볼 수 있을 것이다.

Wii Sports Resort Trailer from E3 2009

더 이상 느린 Wii게임은 없다

자이로센서가 제공하는 것은 회전율과 회전각도의 직접적인 측정이다. 이러한 자이로센서는 매우 즉각적인 반응을 하는데, 완벽한 수행은 가속도계와의 교체가 아닌, 가속도계와 함께 사용되었을 때 이루어진다. 가속도계가 직선움직임을 인식해야 하는 반면에, 자이로센서는 매우 작은 회전에 반응하며, 직선 움직임과 손떨림을 방지한다. 3축 자이로가 3축 가속도계와 조합하면서, 두 센서는 3D공간에서 컨트롤러가 얼마나 멀리, 빨리, 그리고 어느 방향으로 움직였는지 인식하며, 당신의 실제 움직임을 놀라운 정도로 정교하게 재연함으로써 진정한 1:1 게임을 가능케 한다. 이것은 바로, 당신이 예상했듯이, 더 이상 소파에 누워 단순히 손목을 움직이는 Wii 게임은 없다는 것을 의미한다.

[Source] InvenSense


Posted by 프로처럼
어플/Sensor2012. 1. 30. 15:34


관련글 목차:

1. Wiimote로 프리젠테이션 하기
2. Wiimote MotionPlus로 자세 구하기
3. Wiimote로 만드는 전자칠판
4. Wiimote를 PC 리모컨으로 사용하자


Wiimote는 내부에 3차원 가속도 센서(accelerometer)를 가지고 있습니다. 여기에 3차원 각속도 센서(gyroscope)를 가지고 있는 MotionPlus를 연결하면 Wiimote의 회전 방향 계산이 가능합니다. 간단히 MotionPlus에서 측정한 각속도를 적분하면 3차원 각도(roll, pitch, yaw)를 구할 수 있을 것으로 생각됩니다만, 적분할수록 오차가 누적되어 각도가 얼마 못버티고 발산해 버립니다. 이것을 보정하기 위해 가속도 센서에서 측정한 중력 벡터를 사용합니다. 다른 외력이 없는 상태에서 중력은 항상 지구 중심으로 향하기 때문에, 가속도 센서에서 측정되는 중력 벡터의 방향을 보고 roll과 pitch 각을 보정 가능합니다. yaw 각을 보정하기 위해서는 지자기 센서(magnetometer)가 필요한데, Wiimote에는 포함되지 않았습니다.


다음 그림은 WiimotePosture 프로그램의 실행 화면입니다.


좌측 상단의 그래프는 각속도 센서에서 측정된 x(빨강), y(녹색), z(파랑) 축의 각속도 성분을 표시하는 그래프 입니다.  좌측 하단의 그래프는 가속도 센서에서 측정된 가속도 성분을 표시한 그래프 입니다. 중력이 항상 아래로 작용하고 있기 때문에 파란색 그래프가 -1g 근처에서 흔들리는 모습을 볼 수 있습니다.


오른쪽 상단의 직 육면체 막대기는 Wiimote를 그린 것입니다. 빨강, 녹색, 파란색 그래프는 각각 좌표계 x, y, z를 나타냅니다. 아래로 굵은 갈색 선은 중력 방향을 표시하며 굵은 남색 선은 각속도 방향을 표시합니다.


Wiimote와 연결하기 위해 블루투스 동글을 PC에 설치하거나, Windows XP에서 Wiimote를 인식시키는 방법, 프로그램 컴파일을 위해 필요한 라이브러리 다운로드와 Visual Studio 설정은 [여기]를 참조하시기 바랍니다. 


아래는 본 프로그램을 실행한 동영상 파일입니다. Wiimote의 움직임을 화면상의 막대기가 잘 추종하는 것을 볼 수 있습니다. 


실행 파일과 소스코드를 올려봅니다. 필요하신 분께서는 다운받아 사용해 보시기 바랍니다. 


WiimotePosture.exe

WiimotePosture.zip


WiimotePosture 소스코드 내에서 회전행렬 R로부터 오일러 각(roll, pitch, yaw)을 계산하는 식은 다음과 같습니다. 소스코드 내에서 행렬 R을 오일러 각으로 환산하는 식이 없어 여기다 적어둡니다. 

[출처] Open Robotics 

Posted by 프로처럼
어플/Sensor2012. 1. 30. 15:23


개발자 사이트 : http://johnnylee.net 
Posted by 프로처럼
어플2012. 1. 5. 12:32
완성도로 치면 내가 만든 어플리케이션 중 가장 높고, 전문성으로 치면 공학 박사님이 만든 알고리즘이고, 디자인은 기준 이하의 디자인은 내놓지 않겠다는 내 친구가 만든 어플리케이션 Like a Pro 빨리 출시 됬으면 좋겠다. 


[Like a Pro] iPhone4를 위한 퍼팅 App

“感으로 했던 퍼팅, 科學으로 하세요!”

[소개]

퍼팅을 포함한 숏 게임 능력은 골프 스코어에 많은 영향을 미친다. 특히, 퍼팅에서 가장 중요한 동작은 리듬과 템포의 일관성이다. 최근 스마트폰에 내장되어 있는 자이로스코프는 미세한 움직임을 정확히 측정하기에 매우 유용한 센서이다.
본 app은 스마트폰에 내장되어 있는 센서의 신호를 과학적으로 분석하고 통계적으로 관리하여 퍼팅의 리듬 및 템포의 일관성을 유지할 수 있도록 안내해 주는 체계적인 퍼팅 트레이너가 될 것이다.

[특징]

① 자이로스코프가 퍼팅 동작을 정확한 수치로 알려 줍니다.


② 일관성 점수가 퍼팅에서 취약한 부분을 알려 줍니다.


③ 퍼팅실력의 향상을 수치와 그래프로 알 수 있습니다.


[사용방법]

① iPhone4를 손에 쥐거나 퍼터에 장착합니다.

iPhone4+Putter

② 연습이나 실제 퍼팅을 합니다.


③ 퍼팅 리듬/템포 및 일관성 점수를 확인합니다.


내가 좋아하는 골프에
그동안 배운 앎을 이용하여
주위 사람들과 재미있게 만들어 본 어플입니다.
집단지성과 소셜미디어가 있기에 가능했고,
설레는 마음으로 세상에 내 놓아 봅니다.


사용 설명서 다운로드


 Like a Pro User Guide v1.0(KOR).doc
 Like a Pro User Guide v1.0(ENG).doc
 Like a Pro User Guide v1.0(JPN).doc


Posted by 프로처럼
어플2011. 12. 23. 08:46
건강, 행복, 꿈이 더욱 커지는 한 해 되시기 바랍니다. !!
즐거운 성탄과 기쁜 한 해 되세요.

良いお年をお迎えください
新年快乐
Bon Annee
Feliz Ano Nuevo
Nuovo Anno Felice
Ano Novo Feliz
Kulu Sanah('aammu) wa antoum bi-khair
glückliches neues Jahr

Personalized boxed Snowball Putting Christmas Card
Posted by 프로처럼
어플2011. 10. 26. 05:12
  1. Open the iTunes or App Store on your device. 
  2. Tap Music from the bottom navigation bar if you're in the iTunes Store, then scroll to the bottom of the page. If you're using the App Store, tap Featured from the bottom navigation bar and scroll to the bottom of the page.
  3. Tap Redeem.  
  4. In the text box, enter your 16-digit code which starts with an "X". (If you have an iTunes Gift Card this is printed on the back of the card).

    Back of card

  5. When done, tap Redeem.
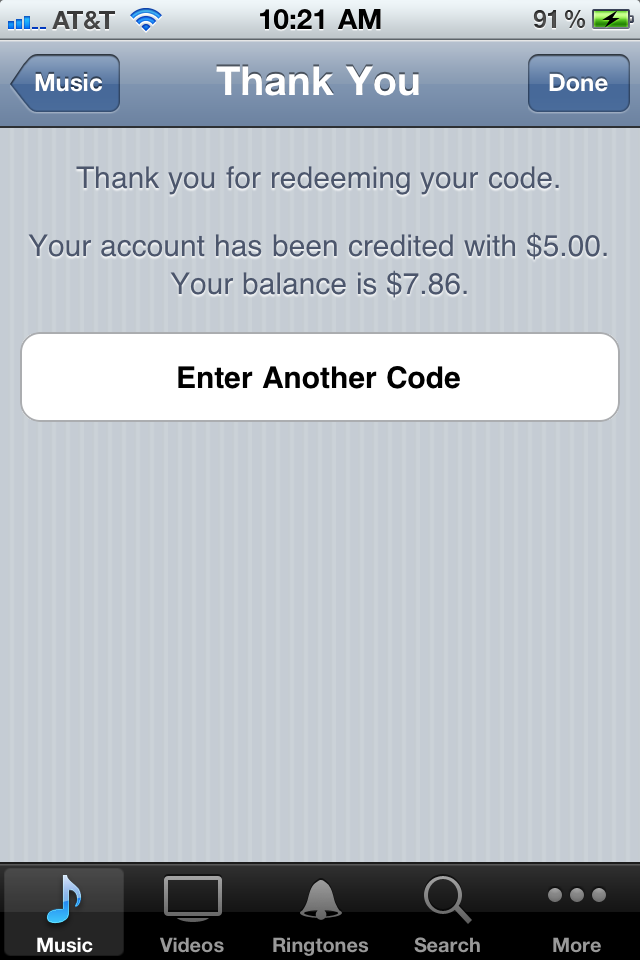
  6.  If you are not already signed in, you will be prompted to do so after tapping Redeem. Once you have successfully redeemed your iTunes Gift Card, you will see the following Thank You page.

    "Thank you for redeeming your code. Your account has been credited..."

 [source] http://support.apple.com

How to Use Redeem Code

Redeem Code?
쉽게 말하자면 상품권 코드라고 생각하면 될 것 같다. 오프라인에서 구매한 상품권을 온라인에서 사용하기 위해 입력하는 코드이다. 문화상품권도 온라인으로 사용하기 위해서는 비슷한 방식으로 온라인 등록을 해야한다.
[Source] OS 3.1 아이팟터치에서 리딤(Redeem) 코드 입력

개발자가 발행하는 홍보용 코드로 이 코드를 이용해 해당 유료 어플리케이션을 무료로 다운 받을 수 있는 코드입니다. 
가장 아래로 스크롤 해 보면 Redeem(교환) 버튼이 있습니다.


Redeem 버튼을 입력하는 칸이 나옵니다


발급받은 리딤 코드를 입력하고 상단에 Redeem 버튼을 누르면 리딤 코드가 입력되어 어플리케이션을 받을 수 있습니다. 


※아이튠스에서 Redeem Code 사용법
Posted by 프로처럼